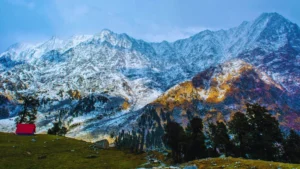
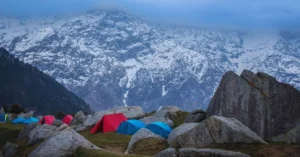
chanchal27025@gmail.com

Kedarkantha Trek in winter: How to reach and Things to carry, know everything before planning

The Kedarkantha trek in winter is like walking through a snow-filled dream. Uttarakhand’s most popular trek is Kedarkantha trek starts from a small village called Sankri. It takes about 5 to 6 days and is perfect for beginners. During winter. The whole path is covered with snow and frozen lakes. As you climb higher, you’ll see beautiful views of snow-covered mountains like Swargarohini and Bandarpoonch. The summit is around 12,500 feet high, and the feeling of standing there is just magical. Cold nights, cozy tents, warm bonfires, and the starry sky make this trip even more special. The best time to do this trek is from December to April. It’s a great way to enjoy nature, feel peaceful, and have an unforgettable winter adventure. Just wear warm clothes, good shoes, and get ready to explore the beauty of the Himalayas! How to reach Sankri, Uttrakhand Use Bus from Dehradun to Sankri by bus. Most buses depart from the Dehradun train station or bus stand between 5 and 8 am. By taxi It will take approximately eight hours to drive the 200 km from Dehradun to Sankri. From Dehradun, taxicab services are available and frequent. Taxis can cost between Rs900 and Rs1200 per person, depending on the vehicle used. Get cab contacts by calling or messaging us. Time of arriving at Sankri village after 3 p.m. to report trekkers. POC information will be made public before the event. Things to Carry Keep waterproof Shoes for trekking , well-gripping, ankle-supporting touring shoes with you. Don’t bring athletic footwear. Three layers of warm clothing Keep coat coats, padded jackets, and two or three layer jackets with you. Two or three hiking pants Keep lightweight cotton travel pants with you. Films and denim are not appropriate for touring. Three t-shirts (dri-fit/collared) t-shirts with full sleeves that protect the arms and neck from sunburn. Keep a few of Dri-fit t-shirts with you. Top and bottom thermals are carried by thermals. Sunglasses are required. The trip will be covered in a lot of snow, which can cause snow blindness. Carry a cap to protect yourself from the intense sun at high altitudes. Keep water-resistant gloves with you; woolen gloves will become wet if you touch snow. Three to four pairs of socks as well as a pair of wool socks You can bring a pair of wool socks for the evening in addition to two sports socks. LED arsonists and headlights are required. Burnooses/Mac Rain and snowfall are somewhat often at High Mound, thus it’s imperative to have a poncho to keep dry. The trip will proceed according to schedule even if it rains. Water bottle and lunchbox Each participant should bring their own lunchbox and an insulated water bottle. Inclusions Accommodations (three tents)|two tents at an additional expense of Rs 1000 per person Meals (dinner, breakfast, lunch, and snacks) Fees for camping (authorizations for camping and forestland) Trekking gear, such as a high-quality tent and sleeping bag Gaiters (to keep snow off your shoes) Safety equipment (premium first aid kit) Professional trip leaders (qualified camp and trek leaders) Professional Trek Support Staff (cook, assistants, etc.) Individual Health Insurance (via Asego Travel) 5 GST Exclusion Food and transportation to and from the base camp Charges for backpack offloading Any specific costs The price of the emergency travel plan This is the best way to plan a perfect trek of Kedarkantha to explore hassle-free. Follow all the details mentioned in above. In winter, This trek perfectly shines with glowing sun and crystal white snow. You should plan a kedarkantha trek once in a life to experience its beauty of lake and forests. If you are looking for more treks in India, you should click the link or go to treks in India tab to know more about treks. Till then, let me explore more places to inform you ASAP about that hidden gem in India.

Kedarkantha Trek in winter: How to reach and Things to carry, know everything before planning Read More »

yulla kanda

A Perfect Budget-Friendly Travel Itinerary for Yulla Kanda: World’s Highest Krishna Temple

The Yulla Kanda Krishna Temple is one of the highest Krishna temples in the world and lies in the Kinanur district of Himachal Pradesh. This destination is perfect for adventure lovers and spiritual explorers. It is a blend of divine peace and raw wilderness. You may have seen this place on your social media once in a lifetime, but never get a chance to explore. Yulla Kanda is a hidden gem in the Himalayas, offering a unique blend of spiritual serenity and adventurous trekking. It is situated at an altitude of approximately 3,895 meters (12,778 feet). At this altitude, there is a lake around the world’s highest Krishna temple that will leave you awe-inspired. Devotees believe that this temple was established by the Pandavas during their exile. I will tell you this story in the next blog about what scientists have said about this place while researching. Till then, you need to know how to reach Yulla Kanda and what it will cost. How to Reach Yulla Kanda If we combine road trips with thrilling treks to reach Yulla Kanda then it is an adventure in itself. Here’s a step-by-step guide to make it easy for you to go: From Delhi to Reckong Peo Start your journey from Delhi by boarding a bus to Reckong Peo. You will get HRCTC buses which are government buses of Himachal Pradesh. The approximate cost for this ride is ₹1,000. Reckong Peo is the heart of Kinnaur and a mesmerizing place for exploration. From Reckong Peo to Yulla Khas Village From Reckong Peo, take another bus to Yulla Khas Village. The bus fare is less than ₹100, but if you prefer a more private ride, take a shared cab for ₹400 to ₹600. These drivers can charge you more if you don’t know the actual price. Day 1: Arriving at Yulla Khas Village Once you reach Yulla Khas Village, find accommodation and then rest up for the exciting trek ahead. Most stays cost around ₹1,200, including meals. You can’t go for the Yulla Kanda trek at night, but you can explore Yulla Khas and meet new people. Moreover, you can also understand their culture, prepare for the next day’s trek, and what is needed for the trek. Also, sleep early to start trekking early at 6 AM. Day 2: Trekking to the Base Camps Trek Distance: 12 KM Base Camps:- First Base Camp (8 KM) Second Base Camp (10 KM) Start your day with a heavy breakfast—there are no cafés or restaurants along the trek path (keep in mind always). For those who may find the 12 KM trek challenging, take solace in knowing you can stop at either of the two base camps. If you want to stay at the camp, call the owners of the base camps to reach out and set up camp if you have a group. Because sometimes they usually don’t go over there if they do not find any tourists. The trek through dense forests, rocky terrains, long stairs, and open skies will invigorate your senses. Once you arrive at the first base camp (prices are around ₹1,200 per night, including meals). The site offers a peaceful experience, perfect for stargazing in the middle of the mountains. Day 3: Visiting Yulla Kanda Krishna Temple Rise early the next morning to reach the Yulla Kanda Krishna Temple. After a 4 KM trek from the base camp, you’ll find yourself standing before the temple— The epicenter of a truce and spirituality. Spend 2 to 3 hours exploring the temple, capture a moment with your camera, and enjoy a mind-blowing view. Post-visit, trek back to the base camp, and have your breakfast. If you’re feeling adventurous, consider extending your stay at the base camp for 2 to 3 days to appreciate this region’s magnificence. Day 4: Return to Yulla Khas Village With a heart full of memories and a mind refreshed, start to trek back to Yulla Khas Village. You can either spend another night in the village or go back to Reckong Peo. As I said, this place also offers an epic view of the coast of rivers. You can easily find places to stay at the cheapest price One more thing: if you want to go back, you need to find a bus before 5 PM. HRCTC buses return to Shimla before sunset. Important Tips for a Hassle-Free Trip Solo Travelers Beware: Avoid trekking alone. Hire a guide for safety and navigation. Weather recommendation: Plan your trip between March and November, as the base camps are mostly deserted during the harsh winter months from the end of November to February. But if you want to go, you can visit, but staying there can be risky. About Meals: Have a filling breakfast before the trek and carry some snacks, as no eateries are available. Camping Options: If you have your camping gear, you can set up a camp at the base camps for ₹200 to ₹300. And if you want to get a meal, you can ask the camp’s owner. They will charge 200-300 max. Why Visit Yulla Kanda? Yulla Kanda is not just a destination; it’s a spiritual experience at the top. From the moment you set foot in the serene village of Yulla Khas to the time you stand in awe of the world’s highest Krishna temple. Every step immerses you in nature’s grandeur and among the heartwarming people. Whether you’re a beginner trekker, a spiritual seeker, or a person who wants to escape and sleep in nature’s land, Yulla Kanda offers something extraordinary. budget-Friendly travel Delhi to Shimla (Bus/Train) ₹800–₹1,200 (HRCTC buses are available that will drop you directly reckon Peo at 1000, but it’s hectic) Shimla to Reckong Peo (Bus/Taxi) ₹500–₹700 Reckong Peo to Yulla Khas (Bus/Cab) ₹100–₹600 Homestay in Yulla Khas (per night) ₹1,200 Base Camp Stay (including meals) ₹1,200 Own Camp Setup Charges ₹200–₹300 Guide Charges (per day) ₹1,000–₹1,500 So, pack your bags, lace up your trekking boots, and get ready to embark

A Perfect Budget-Friendly Travel Itinerary for Yulla Kanda: World’s Highest Krishna Temple Read More »

Why Meghalaya is becoming a popular destination for travel in India

When talking about Meghalaya, you are talking about clouds and rain because it is referred to as the Abode of Clouds.” This is a place of cascading waterfalls, clean rivers, and green forests. This northeastern area is now all over Instagram and YouTube to explore. As a traveler, I know, you also want to know why Meghalaya is becoming a sensation on travelers’ bucket lists. Let me convince you that this place is not only about rain or clouds but more. On Instagram, you have seen many places, but in this blog, you will read more other untouched gems of Meghalaya. So let’s go, travel buddy to know unexplored places in Meghalaya to plan a trip here. Unexplored Gems in Meghalaya – Kongthong – The Singing Village In Meghalaya, villages look more beautiful than cities. Kongthong is a village known for the singing village in Meghalaya. In this unique village, residents communicate through whistled tunes. It means villagers have their names with some whistle tunes. I know, you have also seen this village on Instagram. Add this place to experience something new about this place and its people. – Nongkhnum Island Nong Khnum Island, Asia’s second-largest river island, offers pristine beaches and waterfalls. If you are looking for camping and picnics, this place has everything to give. Mawryngkhang Have you seen the most dangerous bamboo trail on the internet? Yes, then Maweynhkhang is the place of the scariest trek in Meghalaya. This bamboo trail offers thrilling views and a cultural connection to the Khasi community. This community has a special cultural heritage where family lineage and inheritance pass through the mother’s side. You have also heard about this place where the groom goes to the bride’s house to live after marriage. You will be shocked to know that most Khasi communities follow Christianity but many of them preserve ancient customs and beliefs. Wari Chora Wari Chora in Meghalaya is a hidden canyon in the South Garo Hills. It is a paradise for adventure seekers. To reach here, you need to do a short trek and enjoy canoe rides through its serene waters. Popular Places to Visit in Meghalaya Shillong Shillong, the capital city, is popularly known as the Scotland of the East. It has everything that you want to explore like waterfalls and rivers. You can visit Umiam Lake for water sports or a peaceful boat ride. The Don Bosco Museum offers a glimpse into the rich cultural heritage of Meghalaya. Entry fees for Umiam Lake are around ₹50 per person; meanwhile, the museum charges ₹100. Cherrapunji It is famous for being the wettest place on Earth, Cherrapunji boasts breathtaking waterfalls like Nohkalikai Falls, the tallest plunge waterfall in India. Entry to Nohkalikai Falls costs approximately ₹50. The Double Decker Living Root Bridge in Nongriat is another marvel. You need to follow a trek and then reach Nongriat. Dawki – Crystal Clear Waters The Umngot River in Dawki is so clear that boats appear to float on air. A boat ride here costs around ₹500 per person. The nearby Indo-Bangladesh border adds a unique touch to your visit. Mawlynnong As you want to know why Meghalaya is becoming a popular travel destination, this village is the attraction point. It is Asia’s Cleanest Village, a model of cleanliness and sustainability. Explore the Living Root Bridge in Riwai, just a short walk from the village. – Mawsynram – The Wettest Place on Earth Known for its heavy rainfall, Mawsynram is a haven for nature lovers. Visit the Mawjymbuin Cave, which has a natural Shivalinga formation. If you are a spiritual traveler, then you must visit this place, popular on Instagram. Budget to Travel Meghalaya Traveling to Meghalaya can be budget-friendly with proper planning. Such as: Flights to Guwahati (the nearest airport) range from ₹2,000 to ₹6,000. Shared cabs from Guwahati to Shillong cost ₹600–₹1,200 per person. Homestays can cost ₹800–₹1,000 per night, while mid-range hotels are ₹1,500–₹3,000. And talking about the local meals may cost ₹100–₹300 per person. Meghalayan cuisine is a delightful mix of flavors. Must-try dishes include: Jadoh: A rice dish cooked with pork and spices. Doh-Khlieh: A pork salad with onions and chilies. Nakham Bitchi: A tangy fish soup. Pumaloi: Steamed powdered rice, often served during festivals. Pair these dishes with a cup of local tea for an authentic experience. If you want activities on this trip, entry fees and activities like boating or trekking ranges starts from ₹20 to ₹500. A 5-day trip can cost ₹10,000–₹15,000 per person, including transportation, accommodation, food, and activities. It is the best deal to plan an affordable trip to Meghalaya to explore everything. Why Meghalaya is becoming a popular destination Meghalaya’s charm lies in its blend of natural beauty, like waterfalls, clouds, and rain. Whether you are exploring its famous waterfalls, trekking to hidden villages, or learning about its rich culture, Meghalaya offers an unforgettable journey. That’s why you see Meghalaya on your Instagram feed every day. I also want to add that if you are watching these beautiful places on social media, save it and pack your bag to experience every place. If you need an itinerary for this click this and ta-da you have it!

Why Meghalaya is becoming a popular destination for travel in India Read More »

Kheerganga trek for beginners

Kheerganga Trek for Beginners: Buckle Up to Add it to Your Bucket List of Treks

If you dream of walking amidst the mountains, but don’t know where to start, the Kheerganga trek is your perfect beginning. This trek shares a beautiful nature vibe in Himachal Pradesh’s Parvati Valley. This trek is not just a trek, but also about the peaceful villages, scenic rivers, sheep & cows from the mountains, and huge forests you’ll cross along the way. Do you also want to explore the Kheerganga Trek to see the mountain from the top? If yes, then this blog is for you to share every detail of how you can safely complete the trek. Read the full blog to understand everything related to the Kheerganga trek for beginners. Don’t miss anything? Where is Kheerganga? Kheerganga is located in the Parvati Valley of Himachal Pradesh, as I have told you before, sitting at an altitude of around 9,750 feet. It is popular for its natural hot water spring and stunning views of the Himalayas. The trek is around 12 km one way and takes about 4–6 hours, depending on your pace and the route you choose. Because there are multiple destinations from which you can start this trek, I will tell you the shortest one. Kheerganga Trek for Beginners starting point Your journey starts from Manikaran, a holy town located near Kasol, famous for its hot water springs and gurudwaras. From Manikaran, take a cab or a shared taxi to Barshaini, which is the base point for the Kheerganga trek. It’s about 17 km from Manikaran, but from Barshaini it’s around a 12 km trek. After reaching Barshaini, there are multiple villages that you can choose to explore as well and stay there to start your journey from the early morning to use your time effectively. Where to Stay Before the Trek? Here are the most effective places where you can stay and explore these places as well, and start your trek too. Kalga: Just a 15-minute walk from Barshaini, Kalga is a peaceful village full of wooden homestays and cozy cafes. It is a crowd less place and gives a perfect offbeat vibe to start your trek fresh the next morning. But it can be hectic because you need to do a trek with your backpack if you are planning to stay. Moreover, this place is chill and can save you on the expenses of staying. Barshaini: This is a small town with a few basic guesthouses and local dhabas. If you’re looking for something quick and easy, you can stay here for the night. Both places offer budget-friendly options, with rooms starting from ₹300–₹800 per night. However, I suggest staying in Kalga to see some scenic views from the mountain and experience the beauty of nature. Routes for Kheerganga Trek There are three main routes from Barshaini to Kheerganga trek for beginners, mentioned below: Kalga Route (via forest): Starts from Kalga village and takes you through dense pine forests and narrow trails. It is the most popular route among beginners because it’s well-shaded and peaceful. Nakthan Route: The most direct route and a bit steeper. You’ll walk along the Parvati River, and though it’s a little challenging. But the views from here are worth it. Tosh Route: For those who start from Tosh village, this route merges with the Nakthan route. It’s ideal if you want to explore Tosh first. Tosh, a popular village in Himachal, offers calm forests and dreamy nature. Whichever route you take, the trek is full of surprises. You’ll cross wooden bridges, cascading waterfalls, and small cafes with chai & maggi. While trekking, you can meet fellow trekkers who will guide you as well for other Parvati valley treks. The air gets cooler as you go higher, and the sound of the river keeps you company, so grab a warm jacket with you in summer as well. what to do in Kheerganga Once you reach the top, the view is truly magical. I know that trek is not as easy as you think, but with the calm vibe of the mountains, it feels like a reward after the trek. But the best part? The natural hot water spring. Dip into the warm pool built at the top and feel your tiredness melt away. You will also find the Lord Shiva and Kartikeya temple in Kheerganga, which adds a spiritual touch to this journey. As you reached here on time, if you want to go back, you can go, but if you want to stay, there are plenty of camps and tents available at the top. Prices are ₹500–₹1000 per night (including meals). You can either pre-book a tent or just walk in, but I suggest booking before reaching here, so as not to be stuck. Additionally, you are free to set up your tent if you so like. Staying overnight under the starry sky is an experience in itself. If you’re lucky and the sky is clear, you’ll see a sky full of stars you’ll never forget. Tips for kheerganga trek for beginners Begin your trek early in the morning so you reach the top before dark. Though there are small cafes along the way, it’s good to have your own bottle and some energy bars. Wear Comfortable shoes. This one’s a must! Trekking shoes or strong sports shoes will help you walk comfortably. Only carry what you need such as jacket, torch, power bank, basic medicines, and toiletries. Additionally, don’t litter on the trek. Carry your waste back or use the dustbins where available. Best Time to Go The ideal time for the Kheerganga trek is between April to June and September to November. During the winter season, the trek is covered in snow. But if you’re up for an adventure, even snowy Kheerganga has its charm. Last thing to say Kheerganga isn’t just a trek; it’s a journey that opens your heart to the beauty of Himachal and the silence of the mountains. It’s beginner-friendly and budget-friendly to start your first trek as a beginner. So pack your

Kheerganga Trek for Beginners: Buckle Up to Add it to Your Bucket List of Treks Read More »

How to save money for the upcoming trips

9 Tips on How to Save Money for the Upcoming Trip

Planning a trip is always exciting. Whether you are earning well or not, you always want to save money for the upcoming trips. But traveling is expensive. From flight tickets to hotel bookings, every time you need money. The good news is, you don’t need to think of your travel expenses anymore. With the right approach, you can save enough for your next trip without stress. Here’s a guide on how to save money for trips and have fun as well. Research in detail Firstly, know where you’re going and how much it will cost. Research your destination and estimate the total amount you’ll need. It includes costs such as transportation, accommodation, food, activities, and a small amount for emergencies. Once you have a target amount, you’ll know exactly what you’re working towards. Break your goal into smaller amounts. For example, if your trip costs 30000 and you have 6 months, aim to save 5000 each month. This makes your goal less overwhelming and more manageable. Create a Travel Fund Creating a travel fund helps to separate your travel savings from your regular account. Open a dedicated savings account or use an envelope or jar at home. No matter how much you are saving, please put it in your travel fund. Seeing it grow will keep you motivated. Also, name the fund something fun like “Paris 2025” or “Beach Escape Fund” to make it feel more real and make you more focused on it. Cut Down on Non-Essentials Take a good look at where your money goes every month. Are you buying too many coffees? Eating out often? Subscribing to services you don’t use? Try cutting back on things that aren’t necessary and redirect that money into your travel fund. Even saving 100 a day adds up. That’s 3000 a month and will grow in six months. Plan Your Meals Eating out is one of the easiest ways to overspend. Start cooking more meals at home. Pack lunch for work or school. Plan your groceries ahead of time. Not only will you save money, but you’ll also eat healthier. You can find meal planning apps to help you reduce food waste and keep your spending on track. Sell What You Don’t Need Got clothes you no longer wear? Gadgets gathering dust? Old books or furniture lying around? Use online marketplaces, garage sales, or local buy-and-sell groups to sell all of them and get some money from them. It’s a good way to save money for the upcoming trip, and it will keep your house clean and organized. Use Cashback and Reward Programs Start by signing up for cashback apps, reward credit cards, or loyalty programs that offer you the best deal. However, some cards give you points for every purchase, which you can use for flights, hotels, local transport, and other expenses. Now, use them wisely and pay off your credit card in full each month. Don’t spend just to earn points. Only buy what you already need. Take on a Side Hustle Try to find more ways to earn extra money. Freelance work, babysitting, tutoring, or more are great options for a side hustle. You can even turn a hobby into income. Use the extra money strictly for your trip. Remember, every little bit counts. An extra 100 rupees a month could cover your hotel stay or several meals while traveling. For freelance work, you can read the blog on how to start freelancing while traveling. Travel During Off-Peak Times When planning your trip, make sure to plan during the off-season. Because flights and hotels are cheaper, and places are less crowded. This is the best way to save money for the upcoming trip and make it memorable forever. Work on bargaining skills As you know that we are Indians and can bargain at any time to get it at the cheapest price. This skill you need to learn while traveling. Do not buy expensive items that can double your travel budget. Try to communicate in a humble way and convince them to sell at the cheapest price. Well, research on every item that you want to buy during the trip, how it will cost, if there are any other places where you can get it at a cheaper price, and more. Last thing to say Know that saving for a trip doesn’t have to feel like a burden. With some proper planning and smart choices, you’ll be on your way to exploring new places without breaking the bank. Start today and save money for the upcoming trip. Remember that it’s not about how much you earn, but how wisely you save. Happy travels!

9 Tips on How to Save Money for the Upcoming Trip Read More »

earn money as a freelancer to travel freely

The modern way to earn money as a freelancer is to travel freely

The digital era has solved many problems of how we can travel freely. Well, everybody is thinking the same about earning money while traveling. I have a solution that you can earn money as a freelancer and travel anywhere, anytime. But how will you become a freelancer, and how much can you earn in freelance work? Let’s explore freelance work and understand the new work model. What is freelancing First, you need to understand what freelance is. Before freelancing, people were doing a 9-5 job, which is no longer in the digital world. Freelancing is popular because it’s a job where you will be your own boss of the work. Moreover, you can choose projects you love, whenever you want to work, and wherever you want to work. Whether you are a student or a traveler, it doesn’t matter. You can do freelancing by your choice. In simple words, freelancing is working independently for different clients instead of being permanently employed by a company. It refers to self-employed; they get paid per project, per hour, or task. How to start freelancing As you are aware of what freelancing is, let’s explore how to be a part of it. Here’s a simple guide to start your freelancing journey when you are traveling. Pick a skill Before thinking of money and all, you need to ask yourself what work is suitable for you, such as writing, designing, photography, coding, editing, digital marketing, or PR. Pick any one of them you are confident about and enjoy while working. Craft a portfolio While searching for work, you need a perfect portfolio to show your talent to your clients. Create a portfolio showcasing your best work. If you are new to this and don’t have any work to showcase in your portfolio, do a few sample projects at a lower price or for free to make your portfolio. To create your portfolio, you can use tools like Canva, PowerPoint, Word, etc. Canva is the best choice to make a portfolio where you can find plenty of portfolio templates to use and edit. Learn more about how to use Canva and create a portfolio on it. Create accounts on freelance platforms When you are planning to start as a freelancer, you should know about platforms like Upwork, Fiverr, Freelancer, PeoplePerHour, Toptal, Dribble, and many more. These platforms help create your freelance account, where you can find the best clients easily using the internet. Start creating accounts on each platform so you won’t miss any chance to get clients. Click a professional photo to use and add your portfolio to these accounts. A clear and concise description must be written that will show what service you are offering to the clients. Search for more freelance platforms that are not trending so you can avoid the crowd on these platforms and connect with the clients without competition. Time to pitch Search for the projects that match your skills. Write a cover letter that tells why you are the right person for the gigs. Do not get stuck with one or two projects. Look for more and more projects until and unless you get one. If you are not getting selected, do not stop and keep applying. In the beginning, you can select projects for free to get feedback and reviews on that platform that help to reach more clients. Deliver projects on time When you get projects, do the work and deliver it before the deadline. Try to impress your clients with your work; they will help in getting more projects and can recommend you to others. Now you have some money to travel wherever you want to go. So book a train, flight, or travel agency for new trip to meet new people, places, and environments. How much you can earn Money as a freelancer After knowing, how to become a freelancer, you want to know how much you can earn as a freelancer when you have a skill. Your income as a freelancer depends on your skills, experience, and the number of clients you have handled. Including this, your income also depends on per hour, per project, or one word per Rupee (or dollar) (as a writer). Here’s a rough idea of the money you can earn while traveling as a freelancer. writers Beginner: 500-1000 (in rupee) Experienced: 20,000-50,000 Designers Beginner- 1500-3000 Experienced- 40000-80000 (depends on the clients) Web Developers Beginner: 5000-10000 Experienced: more than a Lakh Digital Marketer Beginner: 30000-70000 (per month) (per client). Experienced: 40000-more than a lakh content creator Beginner: 1000-5000 Experienced: 10000-50000 As much as you can handle projects in a month, and according to this, you will earn money as a freelancer and travel at the same time. Do not forget that you are traveling, so handle clients accordingly. Final words from me Freelancing is more than just work- it’s a lifestyle. It gives you the freedom to travel without quitting your earning chances, meet new people, and grow in your career as well. Now plan and pack your bag to follow your travel dreams, and know that you can earn, travel, and live the life you always wanted. Inspired to start? Share your freelance journey and travel experiences with us, using #Alifetour and tagging us on Instagram. Let’s grow this community of digital nomads and free-spirited travelers together.

The modern way to earn money as a freelancer is to travel freely Read More »

How to create a ghibli-style image using AI tools

How to Create a Ghibli-Style Image To Follow The Trend

Studio Ghibli’s animation style is dreamy and full of emotion. Imagine lush landscapes, soft pastel tones, and characters that feel alive. Whether you’re an artist or just a fan who wants to turn your photo into a Ghibli-style image, you can create a Ghibli-style image using AI tools. Let me guide you on how to do it—and where you can create that magical vibe! But first, you should know what a Ghibli-style image is and what it looks like if you don’t know. What is a Ghibli-style image? A Ghibli-style image usually has pastel and earthy tones, soft light, and warm shadows. It also includes detailed natural environments. It brings you wonder and nostalgia. This image has characters with expressive and round features. Creating this look manually is difficult if you’re not an illustrator or a designer. But luckily, some online platforms and tools can help you create Ghibli-style images with ease—even from a regular photo! AI Tools to Create Ghibli-Style Image 1. Artbreeder It lets you blend images with different art styles. Like a Ghibli-style image, and yes, you can experiment with character faces and scenery to match more to the Ghibli tone. It is best for stylized portraits and dreamy character design. 2. DeepAI/Deep Dream Generator Deep AI uses AI to apply dreamy and surreal effects to your images. If you have a travel photo that you want to create a Ghibli-style image, this is perfect for backgrounds and landscapes. It creates fantasy-style scenes from photos that amaze everybody. 3. Fotor AI Art Generator It turns text prompts into anime or Ghibli-style art. It is good, especially with the right prompt (e.g., “anime forest scene in Ghibli style”) and best for quick Ghibli-inspired illustrations from scratch. 4. Dream by Wombo Dream by Wombo Generate artworks using text prompts and AI. It can come close, especially with fantasy and soft-color prompts. It creates soft and detailed backgrounds with a Ghibli mood. 5. Midjourney (via Discord) It is an advanced AI art generator using prompts. Is it good for the Ghibli-style image? Absolutely. With the right description, like “Ghibli-style anime boy walking through a magical forest,” you can get beautiful results. Midjourney provides high-quality, customizable AI art but requires Discord and some prompt skills. 6. Chat-GPT And of course, how can I forget ChatGPT? A free version to use for writing, generating codes, and to create Ghibli-style images as well. You need to upload your image, click the plus sign at the search bar, and add a prompt like “create a Ghibli-style image.” And wait for 5-10 minutes to get it. Tips to create a Perfect Ghibli-Style Prompt If you’re using AI tools, you need a perfect Ghibli-style image prompt to use these tools perfectly. You can copy and paste these prompts into AI tools. “A girl walking through a sunflower field, Ghibli-style, warm tones” “A small town by the sea, soft sunset light, anime landscape” “Studio Ghibli-inspired forest with magical creatures and fireflies” Add moods like “nostalgic,” “dreamy,” or “cinematic” for better results. Edit and Animate for Further If you need to edit your Ghibli-style image, you can also use Canva to add Ghibli-style filters or background edits. Picsart is for photo retouching in an anime style. And the third is Procreate: if you’re into digital painting and want to draw on top. Summing up Creating a Ghibli-style image doesn’t require you to be an expert artist anymore. With AI art generators and easy-to-use apps, you can turn your normal image into a Ghibli-style image. It is trending on Instagram, going viral, so it’s exciting for you too to create a Ghibli-style image with your friends and family to post on Instagram, Facebook, and other social media platforms. Let your inner Ghibli character come to life!

How to Create a Ghibli-Style Image To Follow The Trend Read More »

Places to visit in Jalori Pass

All You Need To Know About Tirthan Valley, Jibhi: Places to Visit in Jalori Pass

Have you ever been to Manali in Himachal? It’s a yes, I know, but do you know that there’s a more beautiful and crowd-free place a little further from Manali? Yes, I am talking about Jibhi, the most tremendous and incredible place in the Kullu district. If you are looking for a breathtaking view of Himachal, there are many places to visit in Jalori Pass, Jibhi, and Tirthan Valley. While exploring Jibhi, I came to know how beautiful it is, with cascading waterfalls, green mountains, and rivers near the homestay. The place has a rich culture and a prosperous history. Let’s deep dive into Tirthan Valley’s places to experience the new wholesome. Places to Explore in Jibhi Jibhi is located in the Banjar Valley of Himachal Pradesh. This place offers breathtaking views of mountains and adventurous activities like fishing, hiking, and more. It features a waterfall located near the Beas River, known as the Jibhi Waterfall. The waterfall provides an authentic forest vibe after crossing 3-4 bridges on the way. In the nearby area, Mini Thailand in Jibhi is another spot that excites visitors the most. This peaceful nature site is known for the sound of gurgling rivers and its relaxing ambiance. Two rocks stand in support of each other, resembling the look of Thailand’s beach. After visiting Mini Thailand, you can enjoy a plate of Maggi and a cup of chai at the nearest cafe, The Pahadians Cafe & Stay. Along with this cafe, plenty of other well-designed cafes are waiting for you to enjoy their meals, especially Siddu, a local delicacy. Places to Visit in Jalori Pass? It’s time to explore Jalori Pass, an adventurous trekking destination. Serolsar Lake, Raghupur Fort, and the 360° viewpoint are filled with mountainous beauty. At Jalori Pass, there is a red board named “Jalori Pass”. It looks tremendously fantastic, and the surrounding mountains appear surreal and divine. If you visit between November and March, you may find heavy snowfall. But if you travel between April and September, the place appears greener than any forest. March is the best time to visit Jibhi if you want to experience light rain and some snowfall. To reach Serolsar Lake, you need to trek around 6 km, which may take 4-5 hours. Near the lake, there is a beautiful temple where you can spend time, click photos, and learn about the history of Serolsar Lake from local people. As I said, “There are plenty of places to visit in Jalori Pass“; one place is known from a blockbuster movie. Have you ever watched Yeh Jawaani Hai Deewani? If yes, then this place will bring back memories of “Bunny”. The film’s scene exists where Deepika desired to see Bhairon Ka Mandir. Remember that snowy mountain scene? In winter, this place looks exactly like that. Also, you need to trek to reach this place and enjoy 360° View of the Himalayan mountains. Know More about Tirthan Valley After exploring Banjar Valley, it’s time to move forward to Tirthan Valley. This place is near Banjar Valley but offers a different view from the top of the mountain. The mountains are tall and greener than Jibhi. If you want to see a waterfall, start a 45-minute trek to reach the stunning Chhoi Waterfall. Chhoi Waterfall is a holy place dedicated to Chhoi Mata. Locals wish to keep this area sacred and clean, so travelers are requested not to litter. A big waterfall drops from a tall mountain, and the entire area is lush green. Here you can find small food stalls that sell Maggi, Momos, and Siddu. Grab some food, enjoy the view, and return before sundown. After exploring the famous spot in Tirthan Valley, check out the creative cafes with beautiful designs. You can find cafes by the riverside, on hilltops, or along the roadsides, whatever suits you the most. Summing Up Now you have all the details to explore this place hassle-free. After Manali, this is one of the best places to experience the beauty of Himachal. Chhoi Waterfall, Jalori Pass, and Jibhi will never disappoint with their charm. March is the ideal time to visit to enjoy the best weather in Jibhi. So, plan a trip to Jibhi and explore its villages and waterfalls. Get a friendly budget itinerary attached to the link below. If you are willing to know more about unexplored places like this, read my other blogs on this page.

All You Need To Know About Tirthan Valley, Jibhi: Places to Visit in Jalori Pass Read More »

places to explore in April

5 Amazing Places to Explore in April in Indian Villages: Stop exploring touristy places anymore

Hello travellers April is the most scorching hot month when we all want to travel to cool places. Well, I know you may be looking for the best places to explore in April to make your vacation unforgettable. I have lists of many places that can make your vacation epic. Himachal’s Best Places to Explore in April One of the most beautiful and popular states is Himachal Pradesh. Places like Manali, Shimla, Palampur, and Kinnaur make this one special, but I have some incredible places that are less crowded, have epic viewpoints, and have small treks to reach there. Kalga, Pulga, and Tosh are the villages in the Kullu district. To reach these places, trek for 20 minutes and get the best location from the top. These places live in the shell of silence and nature’s lap. Villagers who are building their homestays, hotels, and restaurants to earn. Kalga has 2 treks, the Kheerganga and Bunbuni Pass trek, which are still unknown to the tourists. By reaching these treks, you can find hot spring water here and go camping for stargazing. Many villages in the district of Kinnaur offer breathtaking views of the Himalayan mountains. Kinanur Kailash is one of the most popular in spirituality, filled with a thrilling trek. Kalpa, a village, is untouched and popular for monasteries and temples. Ladakh’s valleys We have dreamed of exploring Ladakh plenty of times but never actually planned it. Well, this is the perfect time to experience Ladakh’s Nubra Valley, Kaza Valley, and Khardung La. Pangong Lake is a must-visit in a lifetime, while Khardung La is one of the highest motorable passes in the world, offering thrilling adventures. There’s more to know about Ladakh, which you will explore by visiting these valleys. While planning a trip to Ladakh in April, you need 10 days to spend here and can go from Kashmir as well as from Manali. This will be the most expensive trip of your life, but it will be full of joy and adventure. Maharashtra’s Histories of Forts Maharashtra’s masterpieces of ancient Indian art and culture are the Ajanta and Ellora caves, also known as Verul Leni, located in Aurangabad city. These caves are a UNESCO World Heritage site. The cities like Pune, Mumbai, Nashik, Nagpur, and many more are chilled and populous cities in Maharashtra. The echoes of the past, Rajmachi is one of the adventurous and historical forts that share the beauty of Pune. Khandala is a perfect place with lush green valleys and stunning viewpoints. Lohagad Fort, Pavana Lake, Bhaja Caves, and many more offbeat places are worth visiting. Kashmir’s heavenly locations “Kashmir is heaven on earth”, you may have heard this so many times. Then why haven’t you planned to visit here? This is the place that feels calm and home for us. Gulmarg, Sonmarg, and Pahalgam are famous places yet less touristy. Escaping Delhi only for this heaven on earth is mandatory. Phalgam’s Betaab Valley is popularly known for photography and nature walks. Srinagar’s houseboat is famous here and provides a unique stay experience on the floating boats. Jammu is a sacred place known for the Vaishno Devi Temple in Katra. It is divine and gives you a cultural touch here. After visiting the Vaishno Devi temple, you can plan your trip to Patnitop, located in Udhampur, one and a half hours away from Katra. Kerala’s beaches and waterfalls Kerala in April is a mix of backwaters, beaches, forests, lakes, and hill stations. It includes places like Munnar, Alleppey, Varkala, and many more. Apart from these touristy places, Chembra beach-Wayanad, Silent Valley National Park-Palakkad, and Arekkal waterfalls, Kochi, are the offbeat places where you can sleep in nature’s lap, go for adventure, etc. Kerala’s Kochi is a must-visit place, where you find waterfalls, lakes, bird sanctuaries, hill stations, beaches, and whatnot. Kerala has the best places to explore in April, where you will find hidden places and the beauty of nature. April is best to explore meghalaya The abode of the Cloud is another name for Meghalaya. While exploring Meghalaya, you may find plenty of waterfalls, crystal clear lakes, beautiful viewpoints, mystical caves, etc., that can blow your mind with their beauty. The Bamboo Trail-Mawryngkhang Trek in Meghalaya is one of the scariest treks, taking you through bamboo bridges. Lalong Park in Jowai is a less-explored nature park offering breathtaking views of the Myntdu River. Surrounded by dense forests, Langshiang Waterfall offers a spectacular sight, especially during the monsoon. Umiam Lake is a man-made lake that offers adventurous kayaking activities and stunning sunset views. Summing up After knowing these places, if you still have no idea where to go, I don’t think you’ll ever go anywhere to spend your April peacefully. But I am one hundred percent sure that you will pick one of the locations from it and have fun in April. Apart from these, if you want to explore other places like Arunachal Pradesh, Sikkim, Nagaland, or Goa, you can check out my other blogs about them.

5 Amazing Places to Explore in April in Indian Villages: Stop exploring touristy places anymore Read More »

First Glass Bridge-Bajrang Setu In Rishikesh

First Glass Bridge-Bajrang Setu In Rishikesh Opening Date: Explore the Yoga Capital of the World

The Yoga Capital of the World, Rishikesh, will soon become the third place in India to feature a glass bridge. As you know, Rishio ki Nagri is a popular destination for travelers, home to iconic bridges such as Lakshman Jhula, Ram Jhula, and Janki Jhula in Tapovan.

First Glass Bridge-Bajrang Setu In Rishikesh Opening Date: Explore the Yoga Capital of the World Read More »